🎉AI学习星球推荐: GoAI的学习社区 知识星球是一个致力于提供《机器学习 | 深度学习 | CV | NLP | 大模型 | 多模态 | AIGC 》各个最新AI方向综述、论文等成体系的学习资料,配有全面而有深度的专栏内容,包括不限于 前沿论文解读、资料共享、行业最新动态以、实践教程、求职相关(简历撰写技巧、面经资料与心得)多方面综合学习平台,强烈推荐AI小白及AI 1;;爱好者学习,性价比非常高!加入星球➡️点击链接
【 书生·浦语大模型实战营】学习笔记(六):Lagent & AgentLego 智能体应用搭建
👨💻导读: 本篇笔记内容主要为智能体Lagent& AgentLego ,主要对智能体应用理论部分及具体搭建流程详细介绍,并分别进行实战应用,欢迎大家交流学习!
本次学习资料
1.【视频】:Lagent & AgentLego 智能体应用搭建
2.【文档】:https://github.com/InternLM/Tutorial/blob/camp2/agent/lagent.md#1-lagent-web-demo
3.【作业】:https://github.com/InternLM/Tutorial
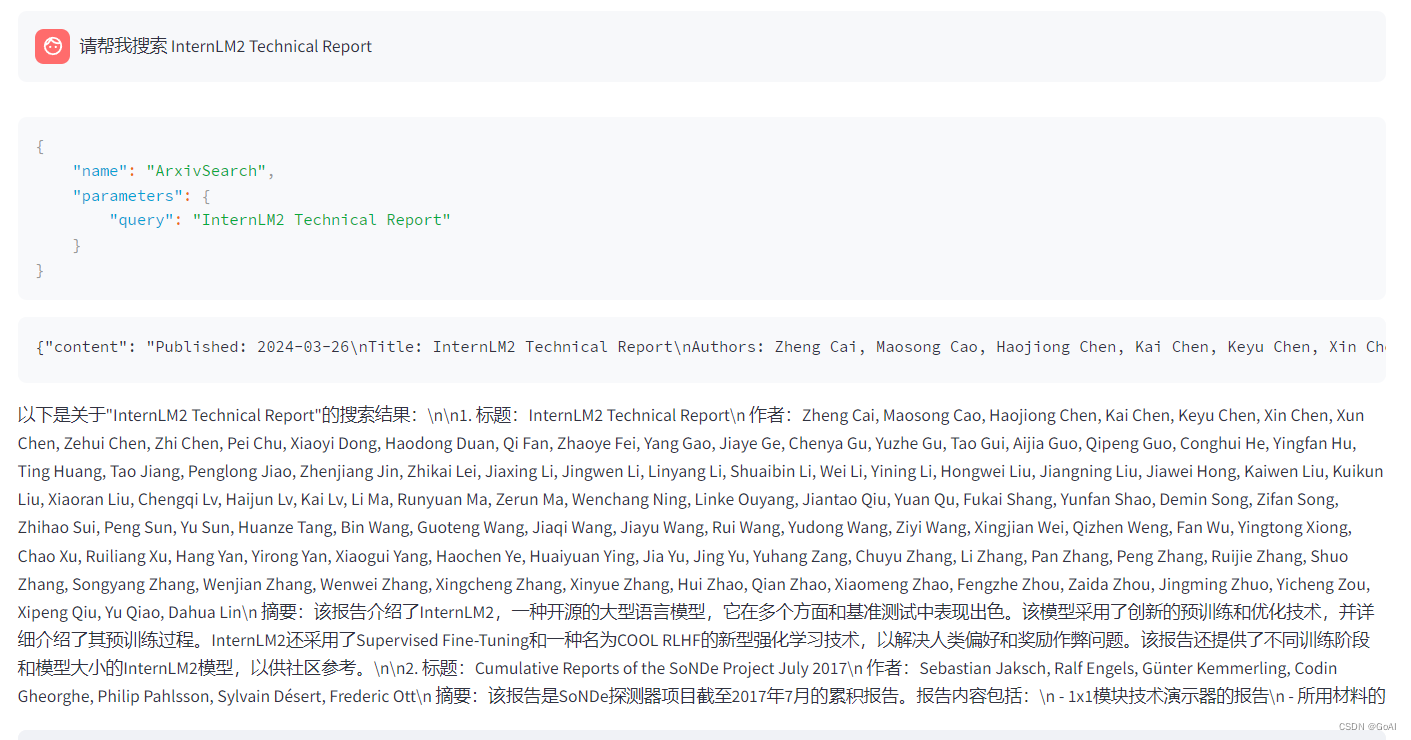
完成 Lagent Web Demo 使用,并在作业中上传截图。文档可见 Lagent Web Demo
完成 AgentLego 直接使用部分,并在作业中上传截图。文档可见 直接使用 AgentLego。
4.【环境】开发机:InternStudio 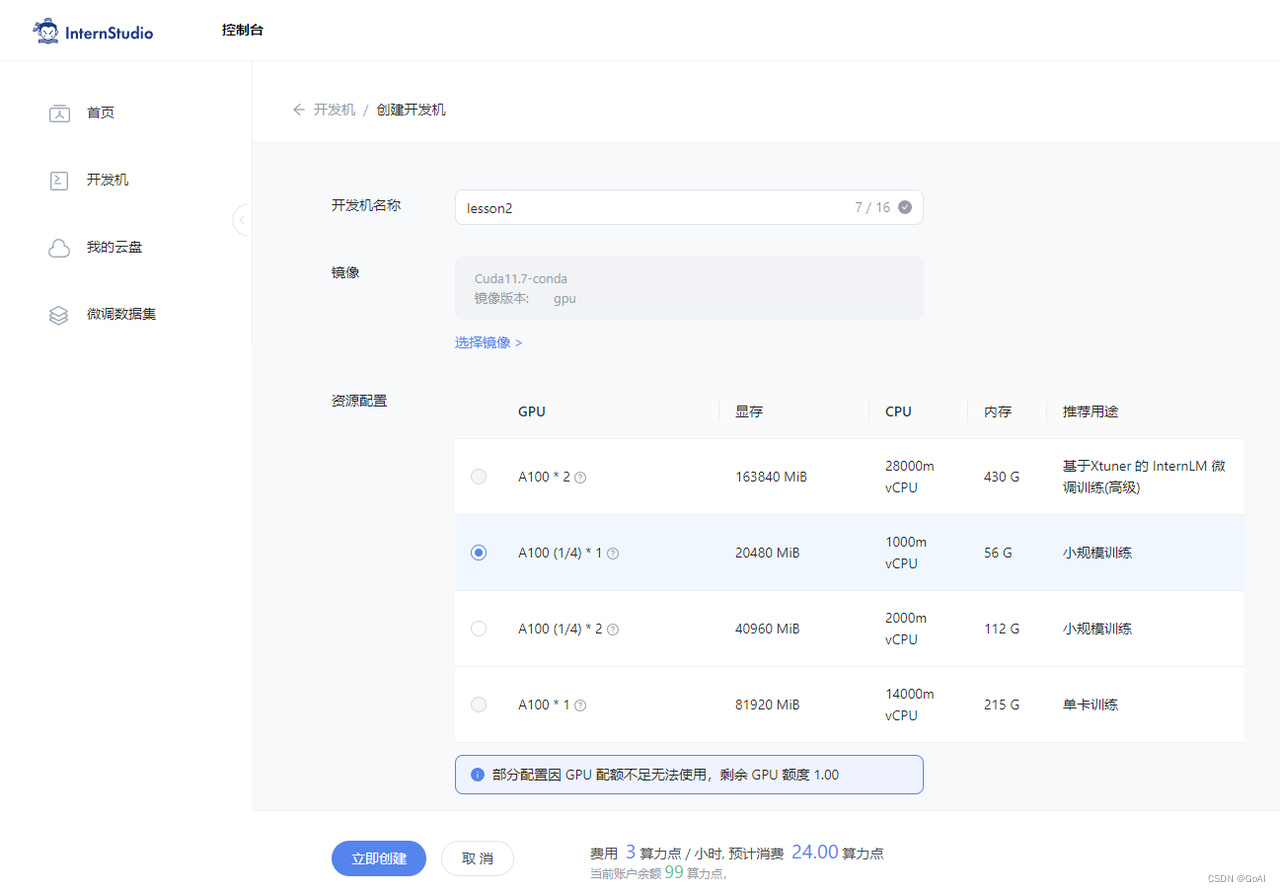
理论部分
智能体组成
大脑:作为控制器,承担记忆、思考和决策任务。接受来自感知模块的信息,并采取相应动作。
感知:对外部环境的多模态信息进行感知和处理。包括但不限于图像、音频、视频、传感器等。
动作:利用并执行工具以影响环境。工具可能包括文本的检索、调用相关APL、操控机械臂等。
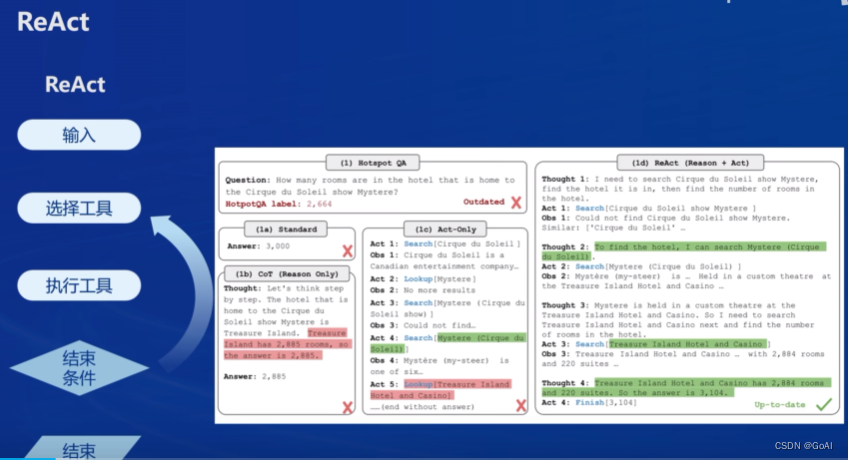
智能体范式
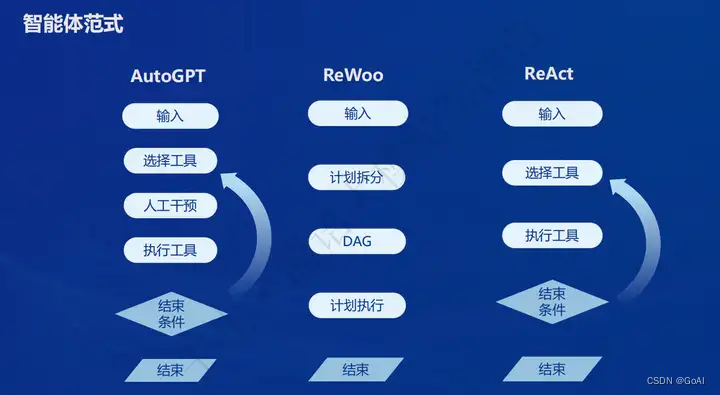
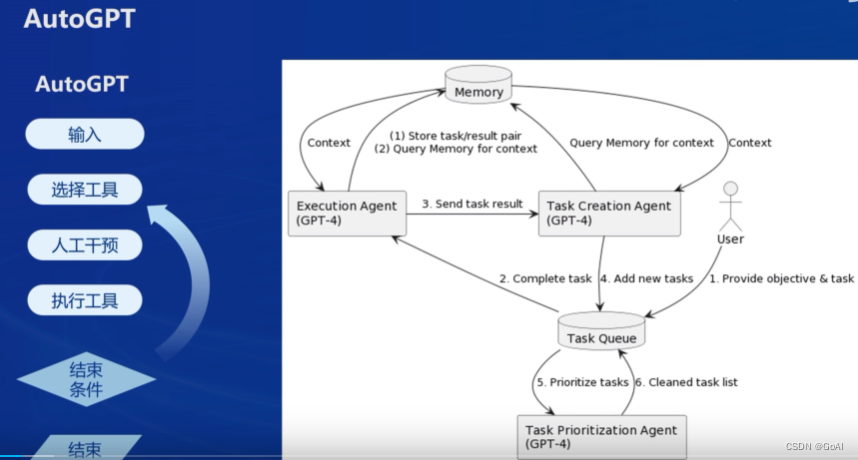
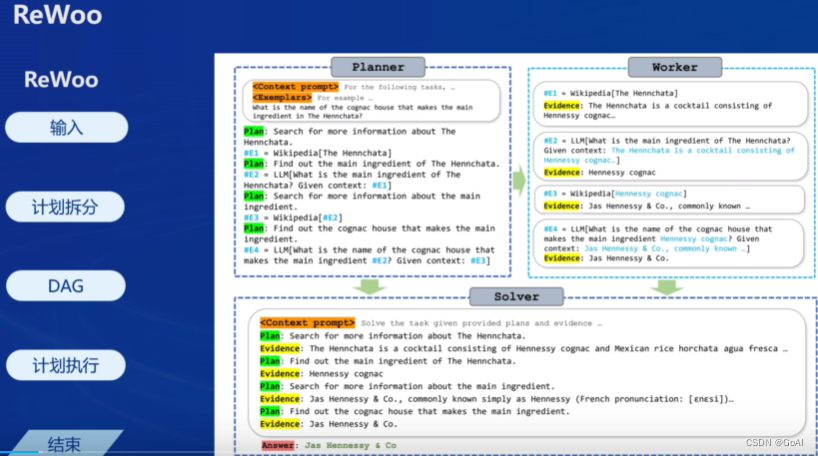
AutoGPT

AutoGPT、ReWoo、ReACT
Lagent介绍
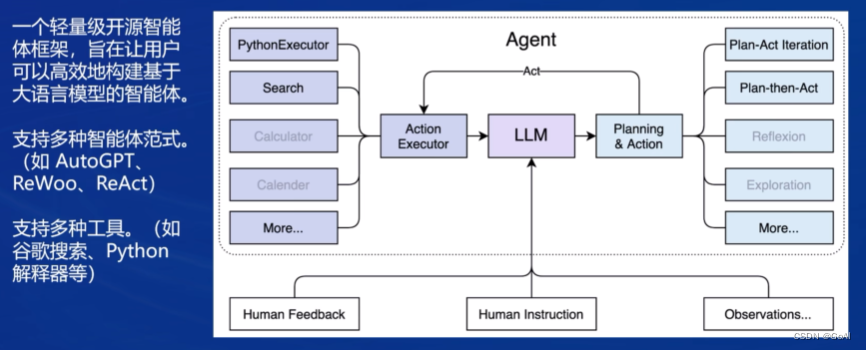
Lagent 是一个轻量级开源智能体框架,旨在让用户可以高效地构建基于大语言模型的智能体。同时它也提供了一些典型工具以增强大语言模型的能力。
AgentLego 是什么
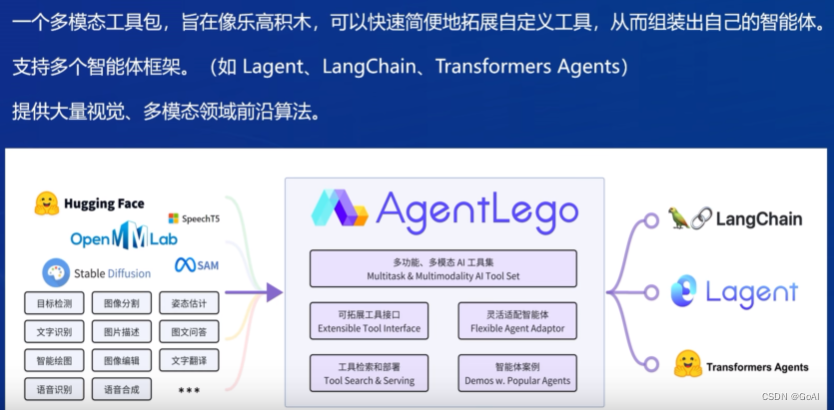
AgentLego 是一个提供了多种开源工具 API 的多模态工具包,旨在像是乐高积木一样,让用户可以快速简便地拓展自定义工具,从而组装出自己的智能体。通过 AgentLego 算法库,不仅可以直接使用多种工具,也可以利用这些工具,在相关智能体框架(如 Lagent,Transformers Agent 等)的帮助下,快速构建可以增强大语言模型能力的智能体。
两者关系:
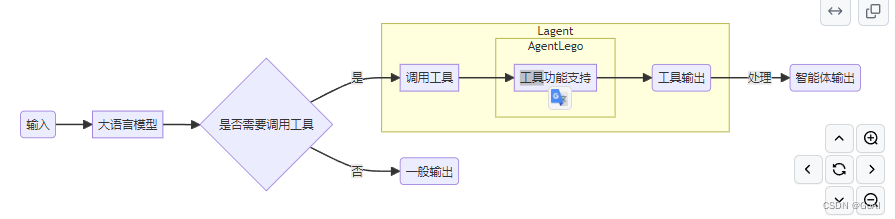
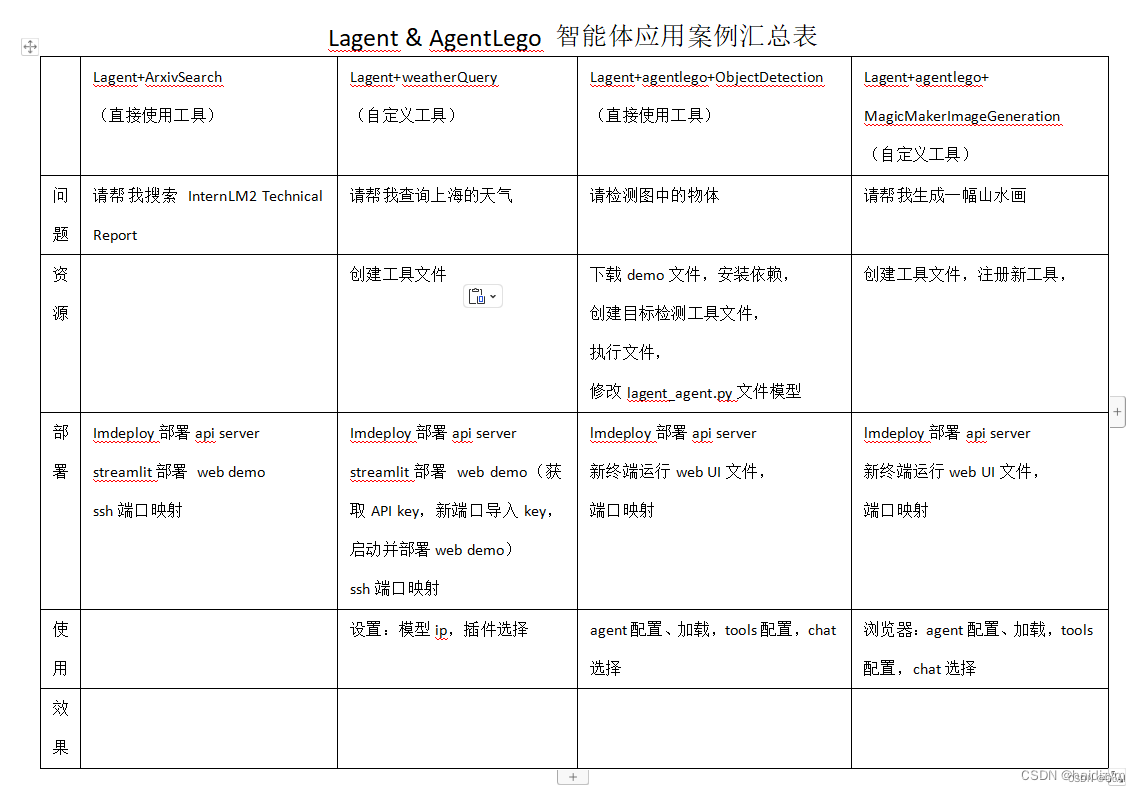
上图总结参考:https://blog.csdn.net/haidizym/article/details/138044672
1.1 Lagent:轻量级智能体框架
安装环境
# 新建环境
mkdir -p /root/agent
studio-conda -t agent -o pytorch-2.1.2

#下载github有关仓库
cd /root/agent
git clone https://gitee.com/internlm/agentlego.git
git clone https://gitee.com/internlm/lagent.git
git clone -b camp2 https://gitee.com/internlm/Tutorial.git

# 激活环境并安装对应工具包
conda activate agent
cd lagent && git checkout 581d9fb && pip install -e . && cd ..
cd agentlego && git checkout 7769e0d && pip install -e . && cd ..
pip install lmdeploy==0.3.0
1.2 Lagent:轻量级智能体框架
Lagent Web Demo
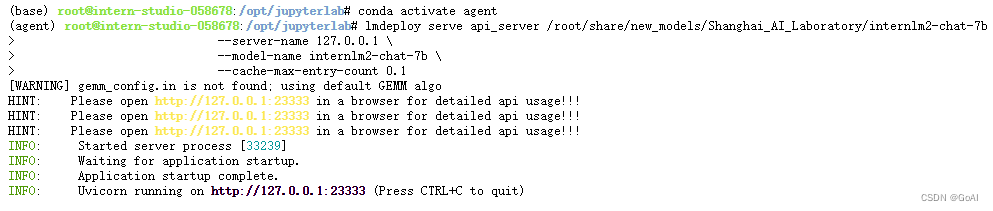
conda activate agent
lmdeploy serve api_server /root/share/new_models/Shanghai_AI_Laboratory/internlm2-chat-7b \
                            --server-name 127.0.0.1 \
                            --model-name internlm2-chat-7b \
                            --cache-max-entry-count 0.1
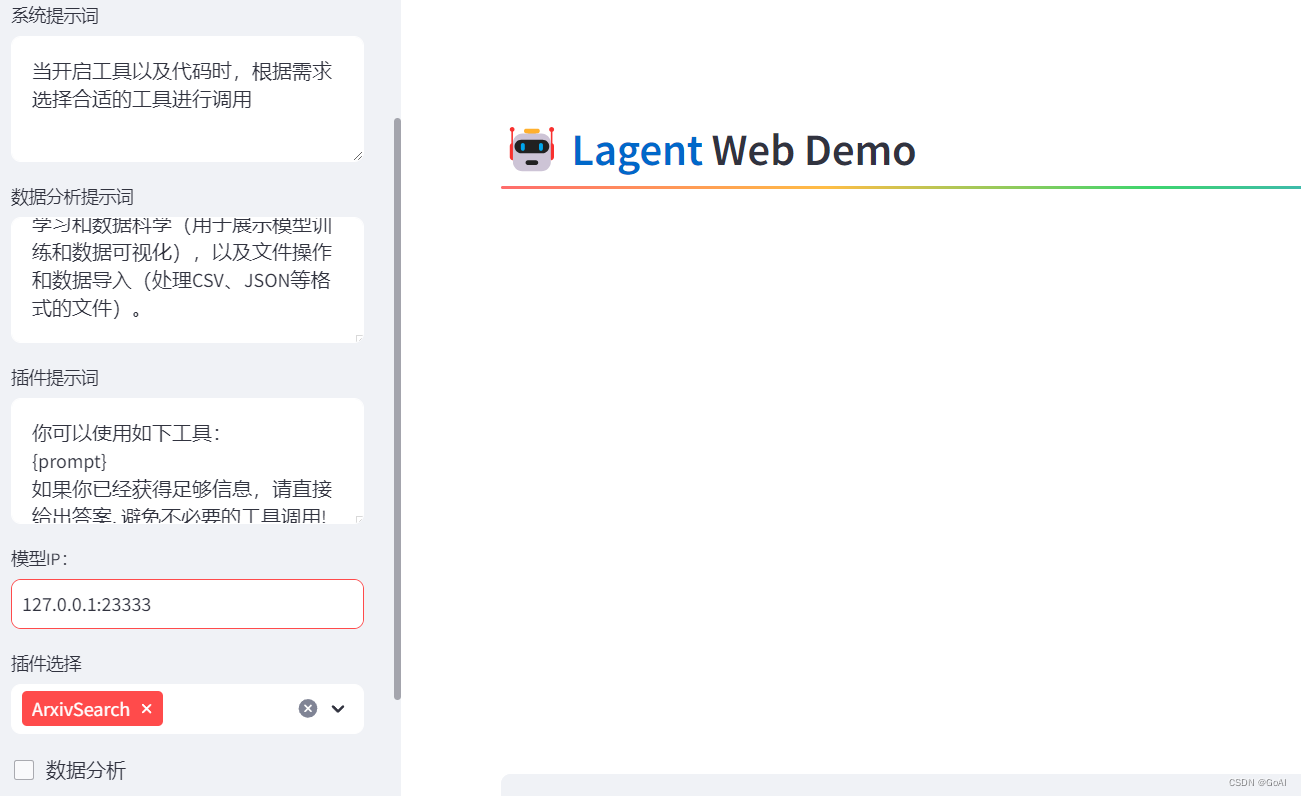
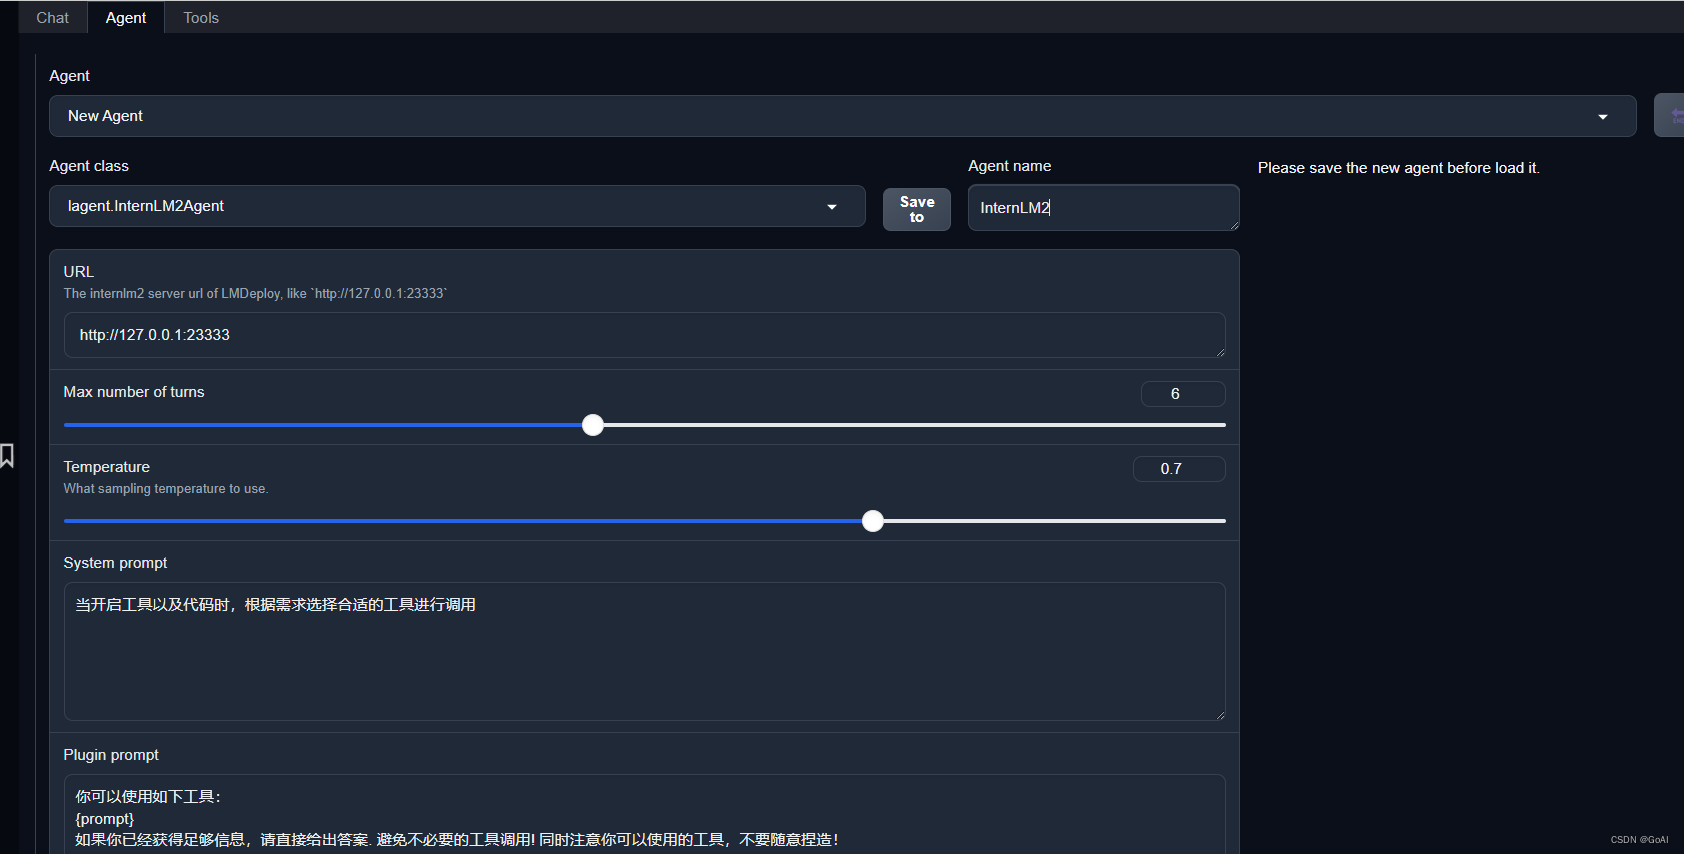
2.启动并使用 Lagent Web Demo
新建的 terminal 中执行下述命令,启动 Lagent Web Demo
conda activate agent
cd /root/agent/lagent/examples
streamlit run internlm2_agent_web_demo.py --server.address 127.0.0.1 --server.port 7860

在等待 LMDeploy 的 api_server 与 Lagent Web Demo 完全启动后,在本地进行端口映射,将 LMDeploy api_server 的23333端口以及 Lagent Web Demo 的7860端口映射到本地。执行:
ssh -CNg -L 7860:127.0.0.1:7860 -L 23333:127.0.0.1:23333 root@ssh.intern-ai.org.cn -p 你的 ssh 41562
效果:
1.3 用 Lagent 自定义工具
使用 Lagent 自定义工具主要分为以下几步:
- 继承 BaseAction 类 实现简单工具的 run 方法;
- 或者实现工具包内每个子工具的功能 简单工具的 run 方法可选被
tool_api 装饰; - 工具包内每个子工具的功能都需要被 tool_api 装饰
目标:实现一个调用和风天气 API 的工具以完成实时天气查询的功能
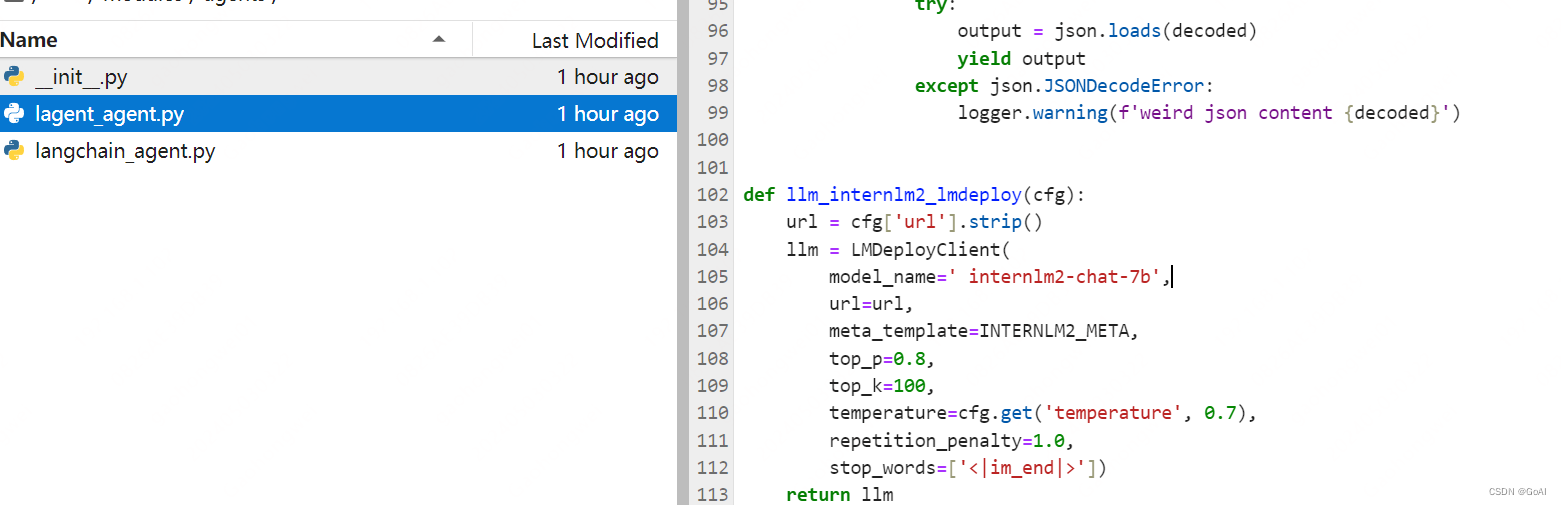
首先通过touch /root/agent/lagent/lagent/actions/weather.py(大小写敏感)新建工具文件,该文件内容如下:
import json
import os
import requests
from typing import Optional, Type

from lagent.actions.base_action import BaseAction, tool_api
from lagent.actions.parser import BaseParser, JsonParser
from lagent.schema import ActionReturn, ActionStatusCode

class WeatherQuery(BaseAction):
    """Weather plugin for querying weather information."""

    def __init__(self,
                 key: Optional[str] = None,
                 description: Optional[dict] = None,
                 parser: Type[BaseParser] = JsonParser,
                 enable: bool = True) -> None:
        super().__init__(description, parser, enable)
        key = os.environ.get('WEATHER_API_KEY', key)
        if key is None:
            raise ValueError(
                'Please set Weather API key either in the environment '
                'as WEATHER_API_KEY or pass it as `key`')
        self.key = key
        self.location_query_url = 'https://geoapi.qweather.com/v2/city/lookup'
        self.weather_query_url = 'https://devapi.qweather.com/v7/weather/now'

    @tool_api
    def run(self, query: str) -> ActionReturn:
        """一个天气查询API。可以根据城市名查询天气信息。

        Args:
            query (:class:`str`): The city name to query.
        """
        tool_return = ActionReturn(type=self.name)
        status_code, response = self._search(query)
        if status_code == -1:
            tool_return.errmsg = response
            tool_return.state = ActionStatusCode.HTTP_ERROR
        elif status_code == 200:
            parsed_res = self._parse_results(response)
            tool_return.result = [dict(type='text', content=str(parsed_res))]
            tool_return.state = ActionStatusCode.SUCCESS
        else:
            tool_return.errmsg = str(status_code)
            tool_return.state = ActionStatusCode.API_ERROR
        return tool_return

    def _parse_results(self, results: dict) -> str:
        """Parse the weather results from QWeather API.

        Args:
            results (dict): The weather content from QWeather API
                in json format.

        Returns:
            str: The parsed weather results.
        """
        now = results['now']
        data = [
            f'数据观测时间: {now["obsTime"]}',
            f'温度: {now["temp"]}°C',
            f'体感温度: {now["feelsLike"]}°C',
            f'天气: {now["text"]}',
            f'风向: {now["windDir"]},角度为 {now["wind360"]}°',
            f'风力等级: {now["windScale"]},风速为 {now["windSpeed"]} km/h',
            f'相对湿度: {now["humidity"]}',
            f'当前小时累计降水量: {now["precip"]} mm',
            f'大气压强: {now["pressure"]} 百帕',
            f'能见度: {now["vis"]} km',
        ]
        return '\n'.join(data)

    def _search(self, query: str):
        # get city_code
        try:
            city_code_response = requests.get(
                self.location_query_url,
                params={'key': self.key, 'location': query}
            )
        except Exception as e:
            return -1, str(e)
        if city_code_response.status_code != 200:
            return city_code_response.status_code, city_code_response.json()
        city_code_response = city_code_response.json()
        if len(city_code_response['location']) == 0:
            return -1, '未查询到城市'
        city_code = city_code_response['location'][0]['id']
        # get weather
        try:
            weather_response = requests.get(
                self.weather_query_url,
                params={'key': self.key, 'location': city_code}
            )
        except Exception as e:
            return -1, str(e)
        return weather_response.status_code, weather_response.json()
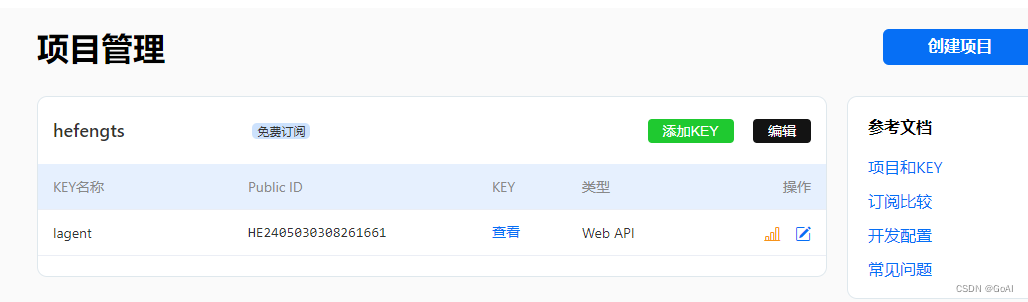
获取 API KEY。首先打开 https://dev.qweather.com/docs/api/ :
重启服务:
conda activate agent
lmdeploy serve api_server /root/share/new_models/Shanghai_AI_Laboratory/internlm2-chat-7b \
                            --server-name 127.0.0.1 \
                            --model-name internlm2-chat-7b \
                            --cache-max-entry-count 0.1
export WEATHER_API_KEY=获取的API KEY
conda activate agent
cd /root/agent/Tutorial/agent
streamlit run internlm2_weather_web_demo.py --server.address 127.0.0.1 --server.port 7860
#本地进行端口映射:
ssh -CNg -L 7860:127.0.0.1:7860 -L 23333:127.0.0.1:23333 root@ssh.intern-ai.org.cn -p 41562
效果:

2.1 AgentLego:组装智能体“乐高”
直接使用 AgentLego
cd /root/agent
wget http://download.openmmlab.com/agentlego/road.jpg
conda activate agent
pip install openmim==0.3.9
mim install mmdet==3.3.0
通过touch /root/agent/direct_use.py(大小写敏感)的方式在 /root/agent 目录下新建 direct_use.py 以直接使用目标检测工具,direct_use.py 的代码如下:
import re

import cv2
from agentlego.apis import load_tool

# load tool
tool = load_tool('ObjectDetection', device='cuda')

# apply tool
visualization = tool('/root/agent/road.jpg')
print(visualization)

# visualize
image = cv2.imread('/root/agent/road.jpg')

preds = visualization.split('\n')
pattern = r'(\w+) \((\d+), (\d+), (\d+), (\d+)\), score (\d+)'

for pred in preds:
    name, x1, y1, x2, y2, score = re.match(pattern, pred).groups()
    x1, y1, x2, y2, score = int(x1), int(y1), int(x2), int(y2), int(score)
    cv2.rectangle(image, (x1, y1), (x2, y2), (0, 255, 0), 1)
    cv2.putText(image, f'{name} {score}', (x1, y1), cv2.FONT_HERSHEY_SIMPLEX, 0.8, (0, 255, 0), 1)

cv2.imwrite('/root/agent/road_detection_direct.jpg', image)
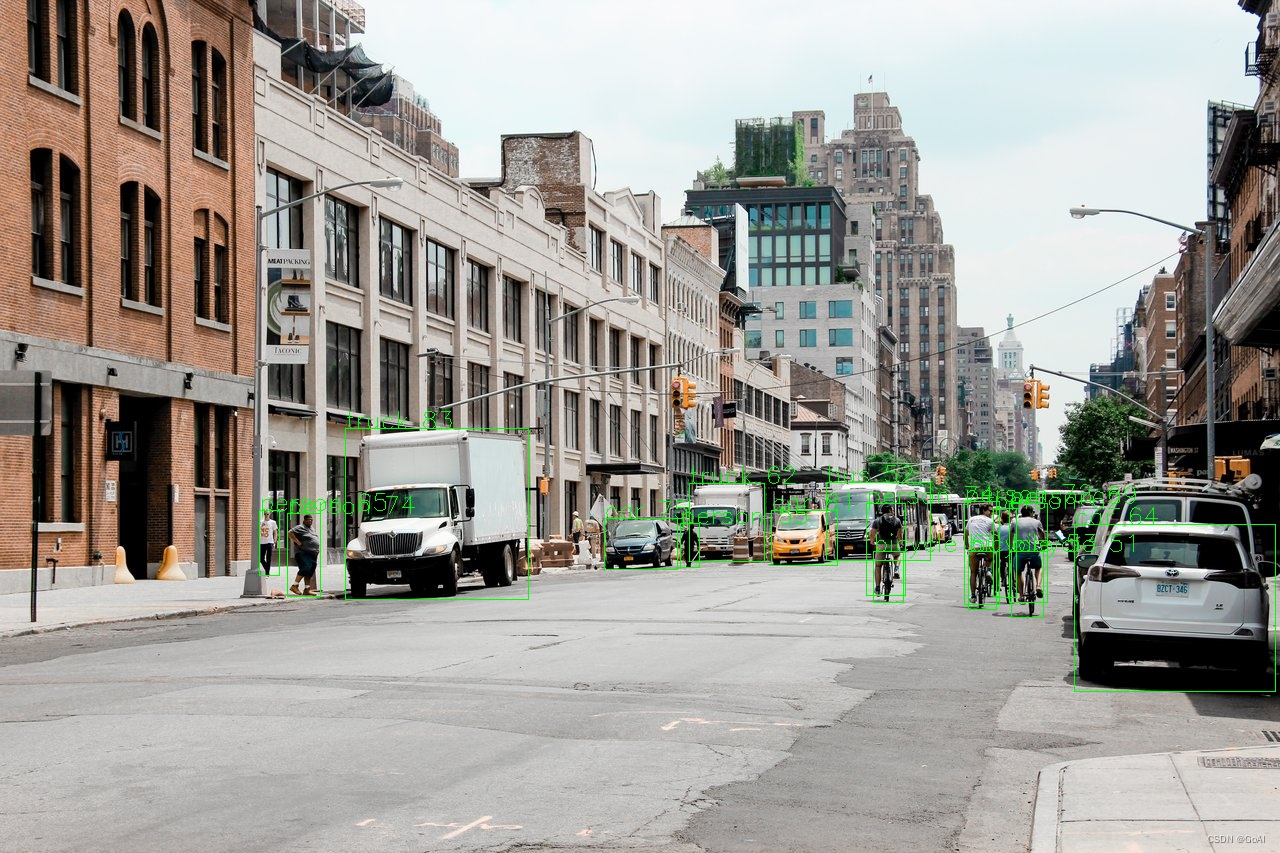
python /root/agent/direct_use.py
推理前:
Inference
truck (345, 428, 528, 599), score 83
car (771, 510, 837, 565), score 81
car (604, 518, 677, 569), score 75
person (866, 503, 905, 595), score 74
person (287, 513, 320, 596), score 74
person (964, 501, 999, 604), score 72
person (1009, 503, 1047, 602), score 69
person (259, 510, 279, 575), score 65
car (1074, 524, 1275, 691), score 64
person (993, 508, 1016, 597), score 62
truck (689, 483, 764, 561), score 62
bicycle (873, 551, 903, 602), score 60
person (680, 523, 699, 567), score 55
bicycle (968, 551, 996, 609), score 53
bus (826, 482, 930, 560), score 52
bicycle (1011, 551, 1043, 617), score 51

推理后
2.2 智能体工具使用
修改代码:
使用 LMDeploy 部署,由于 AgentLego 的 WebUI 需要用到 LMDeploy 所启动的 api_server。
#启动一个 api_server.
conda activate agent
lmdeploy serve api_server /root/share/new_models/Shanghai_AI_Laboratory/internlm2-chat-7b \
                            --server-name 127.0.0.1 \
                            --model-name internlm2-chat-7b \
                            --cache-max-entry-count 0.1
#再新建一个 terminal ,以启动 AgentLego WebUI
conda activate agent
cd /root/agent/agentlego/webui
python one_click.py
#本地映射
ssh -CNg -L 7860:127.0.0.1:7860 -L 23333:127.0.0.1:23333 root@ssh.intern-ai.org.cn -p 41562
使用 AgentLego WebUI
在本地的浏览器页面中打开http://localhost:7860以使用 AgentLego WebUI。

效果

2.3 自定义工具
基于 AgentLego 构建自己的自定义工具(文档教程),自定义工具主要分为以下几步
继承 BaseTool 类
修改 default_desc 属性(工具功能描述)
如有需要,重载 setup 方法(重型模块延迟加载)
重载 apply 方法(工具功能实现)
通过touch /root/agent/agentlego/agentlego/tools/magicmaker_image_generation.py(大小写敏感)的方法新建工具文件。该文件的内容如下:
import json
import requests

import numpy as np

from agentlego.types import Annotated, ImageIO, Info
from agentlego.utils import require
from .base import BaseTool


class MagicMakerImageGeneration(BaseTool):

    default_desc = ('This tool can call the api of magicmaker to '
                    'generate an image according to the given keywords.')

    styles_option = [
        'dongman',  # 动漫
        'guofeng',  # 国风
        'xieshi',   # 写实
        'youhua',   # 油画
        'manghe',   # 盲盒
    ]
    aspect_ratio_options = [
        '16:9', '4:3', '3:2', '1:1',
        '2:3', '3:4', '9:16'
    ]

    @require('opencv-python')
    def __init__(self,
                 style='guofeng',
                 aspect_ratio='4:3'):
        super().__init__()
        if style in self.styles_option:
            self.style = style
        else:
            raise ValueError(f'The style must be one of {self.styles_option}')

        if aspect_ratio in self.aspect_ratio_options:
            self.aspect_ratio = aspect_ratio
        else:
            raise ValueError(f'The aspect ratio must be one of {aspect_ratio}')

    def apply(self,
              keywords: Annotated[str,
                                  Info('A series of Chinese keywords separated by comma.')]
        ) -> ImageIO:
        import cv2
        response = requests.post(
            url='https://magicmaker.openxlab.org.cn/gw/edit-anything/api/v1/bff/sd/generate',
            data=json.dumps({
                "official": True,
                "prompt": keywords,
                "style": self.style,
                "poseT": False,
                "aspectRatio": self.aspect_ratio
            }),
            headers={'content-type': 'application/json'}
        )
        image_url = response.json()['data']['imgUrl']
        image_response = requests.get(image_url)
        image = cv2.cvtColor(cv2.imdecode(np.frombuffer(image_response.content, np.uint8), cv2.IMREAD_COLOR),cv2.COLOR_BGR2RGB)
        return ImageIO(image)
注册新工具。修改 /root/agent/agentlego/agentlego/tools/init.py 文件,将我们的工具注册在工具列表中.
from .base import BaseTool
from .calculator import Calculator
from .func import make_tool
from .image_canny import CannyTextToImage, ImageToCanny
from .image_depth import DepthTextToImage, ImageToDepth
from .image_editing import ImageExpansion, ImageStylization, ObjectRemove, ObjectReplace
from .image_pose import HumanBodyPose, HumanFaceLandmark, PoseToImage
from .image_scribble import ImageToScribble, ScribbleTextToImage
from .image_text import ImageDescription, TextToImage
from .imagebind import AudioImageToImage, AudioTextToImage, AudioToImage, ThermalToImage
from .object_detection import ObjectDetection, TextToBbox
from .ocr import OCR
from .scholar import *  # noqa: F401, F403
from .search import BingSearch, GoogleSearch
from .segmentation import SegmentAnything, SegmentObject, SemanticSegmentation
from .speech_text import SpeechToText, TextToSpeech
from .translation import Translation
from .vqa import VQA
+ from .magicmaker_image_generation import MagicMakerImageGeneration

__all__ = [
    'CannyTextToImage', 'ImageToCanny', 'DepthTextToImage', 'ImageToDepth',
    'ImageExpansion', 'ObjectRemove', 'ObjectReplace', 'HumanFaceLandmark',
    'HumanBodyPose', 'PoseToImage', 'ImageToScribble', 'ScribbleTextToImage',
    'ImageDescription', 'TextToImage', 'VQA', 'ObjectDetection', 'TextToBbox', 'OCR',
    'SegmentObject', 'SegmentAnything', 'SemanticSegmentation', 'ImageStylization',
    'AudioToImage', 'ThermalToImage', 'AudioImageToImage', 'AudioTextToImage',
    'SpeechToText', 'TextToSpeech', 'Translation', 'GoogleSearch', 'Calculator',
-     'BaseTool', 'make_tool', 'BingSearch'
+     'BaseTool', 'make_tool', 'BingSearch', 'MagicMakerImageGeneration'
]
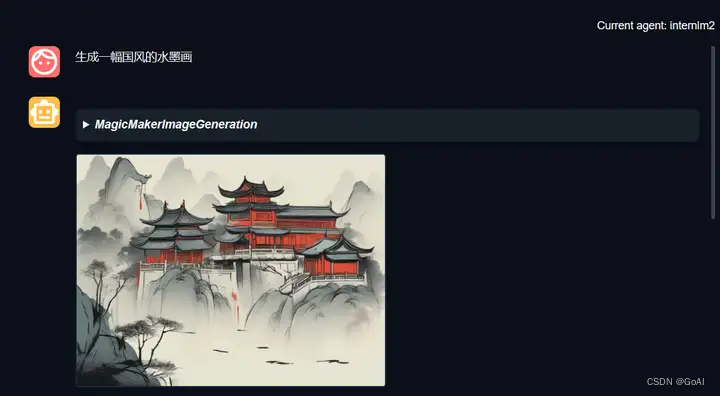
在重复2.2步骤即可运行结果。
总结
本篇笔记内容主要为智能体Lagent& AgentLego ,主要对智能体应用理论部分及具体搭建流程详细介绍,并分别进行实战应用,欢迎大家交流学习!
推荐学习笔记:
https://zhuanlan.zhihu.com/p/694305378
https://zhuanlan.zhihu.com/p/693818434